


EUR
en
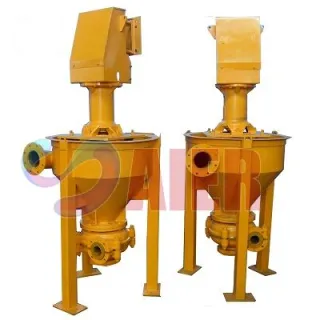
The principle of sand media filtration is quite straightforward. The irrigation source water is pressurized and introduced into the top of the media tanks. A diffusion plate in the top throat of the tank serves to reduce water velocity and distribute the water evenly across the top of the media bed. The media bed is a layer of size-graded crushed silica sand about 16” in depth. The contaminants in the water are captured in the media bed and filtered water passes into the discharge manifold at the bottom of the tanks.
Sand media filters are effective at filtering both organic and inorganic contaminants. The large size and three-dimensional nature of a media bed provides more surface area and has greater holding capacity than many other types of filters. Determining filter capacity and understanding the backwash function (cleaning) of your system are among the most important aspects of successful filtration. These operations and more will be covered in the following pages.
The key to superior media filtration is the effective removal of the captured contaminants from the media bed, commonly referred to as “backwashing”. Located in the bottom of every Flow-Guard Media Filter is a highly engineered underdrain system that is designed to perform two functions. First, it must not allow any media sand to pass through the filters and into the irrigation system. Second, during the backwash operation, it must allow the flush water to be evenly distributed throughout the entire media bed, with no pockets or dead spots. This ensures that the media is lifted and uniformly rinsed free of contaminants in an efficient manner.
The Flow-Guard underdrain is made up of a series of stainless steel wedgewire “elements” attached to a stainless steel spoke system that covers the entire bottom of the tank. The large spoke system allows for a better distribution of the backwash water to the individual wedgewire elements. The wedgewire is effective in preventing media from entering the irrigation system and by design does not get obstructed with media. Covering the wedgewire elements is a layer of gravel. The purpose of the gravel is to deflect the high-velocity backwash water and create a very uniform flow, capable of gently lifting the media in the most efficient manner possible. Efficient backwashing results in cleaner media sand and shorter backwash cycles.
The backwash operation is accomplished by sequentially flushing each tank in a series of two or more filters. To backwash a tank, the small 3-way control valve on the backwash valve is either manually or automatically turned to the ON position. This allows pressurized water from the hydraulic command system to fill the actuator diaphragm and push the piston into the backwash valve. Connected to this piston is a two-sided valve plunger. In the non-actuated position, the spring-loaded valve is seated between the tank inlet and the backwash discharge manifold. This prevents water from escaping into the backwash system during the filtration mode. When actuated, the piston and valve seal move across the inlet port of the tank and seat against the intake manifold, (where unfiltered water enters the tank). This single motion prevents unfiltered water from entering the tank and allows pressurized filtered water in the irrigation system to escape backwards through the tank and out the backwash manifold. Because the backwash flow is dependent upon a source of filtered water from the irrigation system, all media filter systems require at least two tanks, one to supply filtered water for the other tank that is flushing. It is important to keep in mind that only one tank should be flushed at a time.
The Backwash throttle valve is placed on the backwash discharge manifold to control the volume of water that can escape during backwash. Obtaining the proper flow rate of the backwash water is critical for effective flushing. Too high a flow rate will flush all of the media out of the tank. Too low a flow rate will not allow the media to gently lift, fluidize and flush the contamination from the sand. The proper flow rate is dependent upon tank diameter, as shown in the accompanying table. The most common way to adjust the backwash throttle valve is to manually set one filter to backwash with the throttle valve fully closed. Slowly open the throttle valve until small amounts of media are evident in the backwash discharge. It is most desirable to place a nylon stocking or fine mesh screen over the discharge pipe to check for the presence of media. If this is not possible, a sight tube can be used as an alternative. It is desirable to have a slight amount of media discharged during the backwash. You should expect to loose two or three inches of sand per season (100-200 lb. per 48” tank).
Although the media bed is about 16” deep, it makes the most sense to try to keep the contamination in the top couple of inches. This allows you to quickly rinse the sand during a backwash sequence. If the lower depths of media becomes contaminated, it will take much longer to rinse the sand and you run the risk contaminating the underdrain. In order to prevent contamination from reaching the lower depths of the media bed, proper backwash frequency and duration must be determined.
The backwash frequency is dependent upon the characteristics of the contaminants present in the source water. Although the automated backwash controller is equipped with a logic circuit to initiate a backwash when the pressure differential across the filters reaches a given level, (typically 4-6 psi higher than when the tanks are clean), it is oftentimes more desirable to initiate a backwash sooner than this. Very fine silts, for example, are able to migrate deeply into the media bed before an appreciable pressure differential is reached, and they become difficult to remove. Algae and other organic matter tend to harden and cake with time, cementing the media together if not flushed on a daily basis. Therefore, it is a good idea to set the controller clock or manually flush the filters once daily, as a minimum. For heavier loads of contaminants, perhaps every two to four hours. In many installations, the water quality changes during the season and the irrigator is wise to adjust the backwash frequency to the current conditions.
The backwash duration is dependent upon the characteristics of the contaminants and the backwash frequency. A 90-second flush duration should be adequate if the captured contaminants are large particles such as flakes of rust, weed seeds and leaves, which will be laid out upon the surface of the media bed. If the contaminates are fines silts that migrate into the media bed, the backwash duration becomes more a factor of how deep they have migrated, which is directly related to how often the filters are flushed. This is why it is important for the irrigator to periodically observe a backwash sequence and confirm that the duration is of sufficient length to remove all of the contaminants. The backwash water should run clear for 15-20 seconds before the valve is signaled to close.
The operational speed of the backwash valves is a critical factor in determining the backwash duration. When the valve is signaled to open and the actuator diaphragm is filling and pushing the valve piston back, unfiltered water is able to pass underneath the valve seals and escape into the backwash manifold. To the untrained irrigator it appears that the filter is flushing, although it is not. Backwashing does not begin until the piston and valve are fully seated against the intake port, closing off that high-pressure unfiltered water. Only then can the lower-pressure filtered water from the bottom of the filter escape through the backwash manifold, carrying with it the filter contaminants. A new backwash valve operating with good system pressure (30-70 psi) will fully open in 10-15 seconds. Older valves operating in corrosive or dusty environments can take longer to open because of wear and tear on the piston, bushing and O-rings. The filter for the hydraulic control system needs to be cleaned periodically to insure that the valve pistons are receiving clean high-pressure water to operate the valves. It is not uncommon to find one or two filters in a multi-tank system that have slow-acting backwash valves and these tanks are never properly flushed. Occasional careful observation of an entire backwash sequence and periodic inspection of the media will alert the irrigation team to these potential problems.
The dwell time setting on the automatic controller allows you to select the amount of time the controller waits for one valve to close before signaling the next valve to open. This enables you to adjust for slow-acting valves or allows the irrigation system to rebuild its pressure between flushes. If the system pressure drops to a point where it is affecting the filtration backwash capacity, it may be necessary to place a pressure-sustaining valve on the discharge side of the filter station. This valve will automatically partially close off the flow to the field, allowing the pressure of the filter tanks to be sustained at a pre-set level.
It is important to periodically inspect the media. Begin by draining the filters and opening the manway ports. The sand should be level and up to the fill line (the top weld). Dig down through the sand, looking for clay lenses or mud balls that indicate improper backwashing dynamics. If there is any evidence of contaminates reaching the bottom of the media bed, it may be necessary to adjust the backwash frequency or duration. In cases of severe contamination, it may be necessary to remove all of the gravel and media from the filter and replace it with new material. (Periodic inspection will catch most situations before they become this severe.) With new systems, it is advisable to check the media monthly during the first season, and thereafter once or twice per season. Before replacing the manway covers remember to top off the tanks with your selected media. We hope this summary has increased your understanding of the principals of operation of your new Flow-Guard filtration system. The pages that follow will guide you through installation, maintenance and trouble shooting.
The following maintenance schedule is based upon field observations of typical Flow-Guard installations. It should be thought of as a starting point for a systematic maintenance program, not as a hard-set list of tasks that must be completed to be successful.
Note: This assumes that the Autumn Shutdown procedures were performed. If this assumption is incorrect, please review the Autumn Shutdown section.
1. Inspect all portholes, drains, air vents, pressure relief valves, control filters and hydraulic tubing, ball valves, flow meters and backwash manifolds to insure they are ready for start-up.
2. Start the system and initiate a backwash sequence with very low pressure on the tanks, if possible (20-25 psi). Because the tanks were drained, there is a good likelihood that they contain trapped air. This air has the potential of disrupting the media bed when a backwash is sequenced under high pressures.
1. Check the filter pressure differential.
2. Check the flow meter.
3. Check the water treatment injection systems.
1. Check the hydraulic command.
2. Remove and clean the charging manifold screen at the end of the outlet manifold.
3. Observe a filter backwash sequence and confirm that there is sufficient time to flush the media in all of the tanks.
4. Check pressure gauge during operation. Be sure gauge returns to “O” when at rest.
5. Check P.D. reading after backwash and adjust flush time if needed.
6. Check manual backwash throttle valve for proper setting. If it has been tampered with, readjust the valve.
7. Check the reservoirs (if applicable) to confirm that the algae control program is appropriate.
8. To keep tanks looking good in corrosive atmospheres, wash with soap and water, dry and coat with WD40.
1. Open all of the sand media tanks and inspect the media down to the underdrains to determine if the backwash controllers are appropriately adjusted.
2. Check sand level in tank.
3. Top-off the sand levels as needed.
1. Initiate a normal backwash cycle. Do not add cleaners or additives of any kind to the water system. Time the sequencing of the backwash valves’ opening and closing speeds with a stopwatch and make note of the time.
2. Disconnect power to the controller.
3. Rinse and drain all filters, manifolds, control filters, ball valves, backwash valve actuators, backwash lines, chemigation valves, booster pump volutes…all above ground components that may freeze.
4. Inspect and lubricate all of the filter backwash valves. Replace any leaking porthole gaskets or troublesome bolts & nuts.
5. Brush any rusted spots on the cast iron filter components with a wire brush down to clean metal and apply a minimum of two coats of paint.
Some of the other maintenance considerations of your Flow-Guard Filters involve the pressure gauges, backwash valves and view tube, rubber gaskets and seals. The pressure gauge is subject to frequent pressure shocks and in time may loose its sensitivity or not return to “0” when the system is de-pressurized. Because the gauge is an important diagnostic tool for the entire irrigation system, it should be frequently checked and replaced if it appears to be giving erroneous readings.
The backwash valves have a stainless steel operating stem that slides through a PVC guide bushing and a set of o-rings. This is lubricated with lithium-based grease. Placing a yearly shot of grease on the stem through the drain hole on the bottom of the valve actuator body should keep it in good shape. The backwash valves also contain a rolling diaphragm that is subject to wear and may leak after a number of years. Water leaking through the drain hole during backwash is an indication of hydraulic command water passing through the diaphragm. If water drains continually through the drain hole, not just during backwash, it is an indication that the o-ring seals on the piston guide bushing have failed, and unfiltered water is leaking through from the “wet side” of the valve. Another sign of wear in the backwash valves is water continually weeping into the backwash discharge manifold, visible through the sight tube. This is an indication that the plunger seal is not fully seated against the valve. This is usually caused by either a defective plunger seal or chipped epoxy on the valve seat. Removing the valve by taking off the three grooved couplers will allow visual inspection. Removing a backwash valve is quite simple and requires very little time to maintain.
The backwash view tube is clear acrylic plastic. It needs to be protected from sunlight for two reasons. First, the acrylic is not UV stable and will darken and stress crack. Second, sunlight will promote algae growth in the tube, rendering it useless for monitoring the backwash efficiency. Protecting the view tube with a suitable shade is a necessity. A short piece of PVC pipe, split lengthwise and slipped over the view tube will provide excellent protection.
The rubber gaskets and grooved coupler seals may harden with age. If they begin to leak, replace them. Gaskets that continually weep will soon become a worker safety issue as algae growth will make the concrete pad dangerously slick. Because the irrigators will be opening the tank ports to inspect the sand, it is a good idea to have a couple of spare port gaskets on hand. Applying anti-seize compound to the bolt threads will also keep the inspections a simple task.
The cast-iron components of the filters (painted blue) will corrode if the epoxy paint is chipped. It is a good idea to annually inspect the valves, covers and coupler clamps for signs of corrosion. Clean the rust with a stiff wire brush and apply two coats of touch-up paint. The stainless steel components will remain shiny in corrosive atmospheres if they are periodically washed with soap and water and given an application of light oil, such as WD-40.
Chemigation and Fertigation (the injection of chemicals and fertilizers into an irrigation system) are very common practices. Although the Flow-Guard filters are constructed of Type 304 Stainless Steel (Type 316 Stainless Steel is optional), careful consideration should be given to the compatibility of the material being injected with the natural salts present in the source water as well as the potential corrosiveness to stainless steel. The injection of various fertilizers can result in the formation of precipitates that have the potential of plugging the irrigation filter and emission devices. In general, it is advisable to place the injection point downstream of the main irrigation system filters. (CAUTION: This requires placing a suitable filter on the injection line.) By injecting downstream of the filters, there is no threat of plugging the main irrigation filters or of discharging chemicals or fertilizers with the backwash water.
In certain types of source water it may be necessary to pre-treat the source water to prevent natural precipitation, such as lime scale (calcium carbonate) or iron hydroxide. It may be advantageous to inject these water pre-treatments ahead of the media tanks. The compatibility of these compounds with stainless steel and their ultimate fate in the backwash discharge are important concerns.
Note: As with all chemical use, a clear understanding is required. It is recommended that you contact your dealer for assistance.
The filters will not backwash automatically.
Once you have checked all of the above:
Initiate a backwash sequence by pressing the MANUAL START button.
If only one tank will backwash automatically.
The filters appear to be backwashing all the time, even when the Controller is OFF.
The media level is low in the tanks.
The media remains dirty after backwashing.
The differential pressure remains high after a backwash.
Water is escaping through the drain hole on the bottom of the actuator housing.
Bookmark
Daniel Féau processes personal data in order to optimise communication with our sales leads, our future clients and our established clients.


This site is protected by reCAPTCHA and the Google Privacy Policy and Terms of Service apply.